
|
GENERAL |
|
Front Page |
|
 Pipedream |
|
|
Z88 |
|
Z88 |
|
Hardware |
|
 Spares Spares |
|
Software |
|
Shows |
|
Programmer's Section |
|
Quick Guide |
|
Reviews |
|
GDPR |
|
Help & FAQ |
|
Z88 2nd User Section |
|
|
EXTRA |
|
Site map |
|
| Feedback Help |
|
|
ARCHIVE SECTION |
|
|
GENERAL |
|
Adverts |
|
BBC BASIC |
|
Books |
|
Computer Fairs |
|
Flying Page |
|
PC |
|
|
NEWS |
|
Mailshot Promotions |
|
PC Newsletter |
|
 |
|
|
Z88 |
|
Z88 |
|
Hardware |
|
Software |
|
Sunday, 26-Jul-2026 04:49:46 BST
Z88 Training Days
Install
Batteries and Accessories
Initial Reset
Setting Clock & Date
Control Panel
Printer Driving
Using the Control Panel with Printers
Driving a Parallel Printer
Using the Printer
Editor
Getting Information
from the Printer Manual
The Filing System
Basic idea of a hierarchical file system
Organising your data
Creating
Directories
Selecting Directories
Catalogue Files and EPROM
Basics of CLI
 About Batteries
- Take care when installing batteries
- Change batteries as soon as the display goes out
- Using rechargeable batteries
- Different activities use different amounts of battery power
Take care when installing batteries
Due to the LOW current across the battery terminals - it is a good idea to polish the ends before putting them into the Z88. (Some batteries have 'high spots' on them to get over this potential problem)
Change batteries as soon as the display goes out
You may use the Z88 after BATT LOW is on but change batteries as soon as the display goes out
Using rechargeable batteries
We DO NOT recommend using RECHARGEABLE BATTERIES in the Z88
Rechargeable batteries only power the Z88 for a short time
External rechargeable battery packs can be used see Rakewell's zPower system which use batteries used in model racing cars.
REMEMBER 4 rechargeable batteries only give 4.8 volts not 6 and the discharge curve is very steep (not a lot of time to change batteries when BATT LOW comes on)
Different activities use different amounts of battery power
Programming an Eprom takes less current than running a program
Using the Serial Port uses the most power
Discharge curve of Batteries volts / time
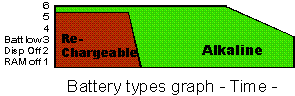
Table of current consumption
| Batteries Type (mAh) | D'cell Cpper - Top 2,250 | Ever R'dy Gold Seal 2,200 | Ever R'dy Silver Seal 1,100 | |
| Function | Days | Days | Days | |
| StandBy before RESET (No RAM) |
.6 |
156. |
152.8 |
76.39 |
| StandBy after RESET | ||||
| (No RAM) |
.4 |
234. |
229.2 |
114.6 |
| (128k RAM) |
.85 |
110. |
107.8 |
54.0 |
| Running (No RAM) |
69 |
1.4 |
1.33 |
0.66 |
| (128k) |
75 |
1.25 |
1.22 |
0.61 |
| KeyPressed (NoRAM) |
85 |
1.1 |
1.08 |
0.54 |
| (128k) |
110 |
0.85 |
0.83 |
0.45 |
| Program (NoRAM) |
97 |
0.97 |
0.95 |
0.47 |
| (128k) |
105 |
0.89 |
0.87 |
0.44 |
| (128k RAM only) | ||||
| Prog EPROM |
85 |
1.10 |
1.08 |
0.54 |
| Printer plugged in |
80 |
1.17 |
1.15 |
0.57 |
| Sending toPrinter |
110 |
0.85 |
0.83 |
0.42 |
| Batteries Type (mAh) | R'well z - Pwer Pack 1,200 | Re - ch'ble AA -size (500) | |
| Function | Days | Days | |
| StandBy before RESET (No RAM) |
.6 |
83.3 |
34.7 |
| StandBy after RESET | |||
| (No RAM) |
.4 |
125 |
52 |
| (128k RAM) |
.85 |
59 |
24.5 |
| Running (No RAM) |
69 |
0.72 |
0.30 |
| (128k) |
75 |
0.67 |
0.28 |
| KeyPressed (NoRAM) |
85 |
0.59 |
0.25 |
| (128k) |
110 |
0.45 |
0.19 |
| Program (NoRAM) |
97 |
0.52 |
0.21 |
| (128k) |
105 |
0.48 |
0.20 |
| (128k RAM only) | |||
| Prog EPROM |
85 |
0.59 |
0.25 |
| Printer plugged in |
80 |
0.63 |
0.26 |
| Sending toPrinter |
110 |
0.45 |
0.19 |
Resetting
the Z88
Hard Reset
Pressing the RESET SWITCH TWICE with the Flap open-
KILLS ALL Suspended Activities
ERASES ALL FILES in RAM packs (internal and external)
Soft Reset -
Pressing the RESET SWITCH TWICE with the Flap closed -
if the Z88 is still running use <>PURGE in INDEX application to avoid the Z88 thinking you want a hard reset.
RESET's the Panel to the 'Default' values i.e. :RAM.0
KILLS ALL Suspended Activities
LEAVES ALL FILES in RAM packs alone (internal and external)
Initial Reset
Is like a HARD RESET
Used when the Z88 has been without batteries
Remember to set
clock & date
Set Clock & Date using []T
(Did you remember changing it from BST to GMT or visa-versa)INFORMATION - Did you know that leaving your Z88 on the Clock prevents it from timing out and switching itself off - so remember to press the ESC key when finished.
Z88 Accessories
RAMs ROMs EPROMs and Flash EPROMs
There are three types of 'devices' that are used on the Z88.
A RAM is used to store data which will be lost if battery power is lost.
A ROM holds the permanent copy of a program that can be run on the Z88
An EPROM is used to store files, which remains there until the EPROM is erased
A Flash EPROM is like an EPROM except that it can be erased in the Z88 itself without using an EPROM eraser.
Expansion Slots
32K, 128K, 512K or 1024K (RAM) devices in slots 1 & 2
Programs (ROM) devices in slots 1, 2 & 3
32K, 128K or 256K (EPROMS) - only in slot 3INFORMATION - When a RAM Pack is installed in slot 1 the Z88 becomes an extended machine. The effect of this is that BASIC (and some other programs) take some of that memory. If you NEVER use BASIC you may like to put your RAM pack in Slot 2 and get the memory back.
| Less than 128K in Slot 1 | 128K or more in slot 1 |
| Map limited to 92 pixels BASIC workspace 8K | Map can be
up to 255 pixels. BASIC workspace 40K |
Installing & Removing Accessories
Put the Z88 in INDEX MODE when INSTALLING or REMOVING PACKS
Leave the Z88 switched ON whilst opening the flap to change the device.
Make sure that it is pushed right in STRAIGHT - (Shorting the pins will result in doing a SOFT RESET) before closing the flap
When REMOVING ROM devices make sure that the Application is not running as a SUSPENDED ACTIVITY.TIP It is a good idea to leave your eprom out of the Z88 when not in use because if the battery goes low it can corrupt the header on the eprom making it unreadable.
REMEMBER if you REMOVE RAM device
(a) You loose all information stored on it
(b) You have to do a SOFT RESET
Starting with a New Device
- Using Devices and the wildcard
- Copying files to the new device
- Initialising an EPROM
- Check the Z88 knows about the Device
- Setting the Default device
Using Devices and the wildcard
When using the Filer you need to know about the Z88 DEVICES
These are defined as one of the following:-
| Spec | Name of effect of the DEVICE |
| :RAM.0 | RAM in slot 0 (internal memory) |
| :RAM.1 | RAM in slot 1 (external memory) |
| :RAM.2 | RAM in slot 2 (external memory) |
| :RAM.3 | RAM in slot 3 (external memory) |
| :RAM.- | Any RAM memory ie 0,1,2,3. Used by CLI temporary files, and lost on reset |
| :ROM.0 | ROM |
| :SCR.0 | Screen |
| :PRT.0 | Printer;via printer driver so that highlight codes are interpreted by the PrinterEd |
| :COM.0 | Communications; via serial port |
| :INP.0 | Standard input (normally keyboard) |
| :OUT.0 | Standard output (normally screen) |
| :NUL.0 | Null:absorbs output, and acts like an empty file on input |
Note :RAM.- files must be deleted before a soft reset is performed with Operating Systems up to and including 3.0
Example How to copy from one device to another (Keyboard to the Screen)
Select Filer []F
Select Copy <>CO
Source : :INP.0
Destination : :OUT.1
Copy :INP.0 to :OUT.0 ? YesPressing <ENTER> here will execute COPY then as you type on the keyboard they will be copied to the screen.
This facility can be used for Copying files to the serial port
Source : FILENAME
Destination : :COM.0
Wildcard characters
A WILDCARD is a special character and means the following:-
- * Matches ANY NUMBER of characters (or none)
- ? Matches a SINGLE character
- // Matches ANY NUMBER of Directories (or none)
Putting a * in the name of a file means "Don't care what follows" so S* would means everything beginning with S and * on its own means everything. The wildcard is used in the following example to select files to be erased.
Other useful examples
| *//training | Finds the file called training anywhere |
| read* | Finds: readme, read.me and reading |
| *.* | Finds only files with extensions like fred.tx, special.tst |
| ..//zP* | Finds
all files beginning with main in the parent directory like :RAM.1/PROJECTS/zPowerInfo, :RAM.1/PROJECTS/ zPowerCheck, :RAM.1/PROJECTS/ zPowerCharge |
Copying files to the new device
For example, to copy all files from the Internal RAM (:RAM.0) to a new Device (say, :RAM.1) you should use Tree Copy.
Select Filer []F Select Tree Copy <>TC Source : :RAM.0 Destination : :RAM.1 Select Device <>SV Name : :RAM.1 |
Check all files have been copied (Note :RAM.1 on top of DIRECTORY)
ERASE all files in Internal RAM (:RAM.0)
Select Device <>SV Name : :RAM.0 Erase <>ER Name : * Confirm each file ? No Select Device <>SV Name : :RAM.1 |
Initialising an EPROM
If a new EPROM has been fitted - Initialise the header by
(a) Selecting Filer []F
(b) Catalogue Eprom <>CE
Check the Z88 knows about the Device
In INDEX select <>CARD and check that the Z88 knows about the extra RAM, ROM or EPROM packs that have been installed.
Setting the Default device
If the new device is to be the new default device (that is, the device that you wish to use most of the time) then change it.
Select Filer []F Select Device <>SV Name : :RAM.1 |
Control
Panel
Main part of the Panel
RS-232 Section for Printers & Comms
- PopDowns and Programs
- Using the Panel
- What the Panel controls
- Interaction between Panel and New Activities
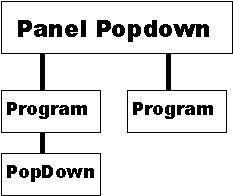
PopDowns and Programs
There are 2 types of Applications that can be run on the Z88. These are: PopDowns and Programs.
Programs are the Main Activity and can be left as "Suspended Activities" whilst PopDowns relate only to the Program they have been PopDown into.
Using the Panel
The Control Panel is selected with []S. It loads its Global settings into any program that uses them. REMEMBER - To leave the Panel with the <ESC> key otherwise it will not be updated.
SAVE YOUR CHANGES WITH <>FS Command.
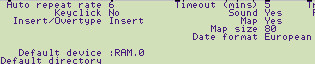
What the Panel controls
Panel Functions effect ALL Programs run on the Z88 - here is a list which application programs use them
| FUNCTION | PROGRAM USED | |
| Auto repeat rate | ALL (Z88) | |
| Timeout (mins) | ALL (Z88) | |
| Keyclick | ALL (Z88) | |
| Sound | ALARM | |
| Map | PipeDream | |
| Map size | PipeDream | |
| Date Format | PipeDream, Filer, Calendar, Alarm | |
| Insert/Overtype | ALL (Z88) | Affects only NEW activities |
| Default device | Filer | |
| Default directory | Filer | |
Interaction between Panel and New Activities
PopDowns are related to the Program running at the time of selecting the PopDown. This is why when using the Filer to change the Directory or Device, it only effects the that Program.
| APPLICATIONS | Type of Application | |
| NAME | KEY | |
| Diary | []D | Program |
| PipeDream | []P | Program |
| BASIC | []B | Program |
| Calculator | []R | PopDown |
| Clock | []T | PopDown |
| Alarm | []A | PopDown |
| Filer | []F | PopDown |
| PrinterEd | []E | Program |
| Panel | []S | PopDown |
| Terminal | []V | Program |
| Imp-Export | []X | PopDown |
| External Applications | ||
| Z-Tape | []J | PopDown |
| zBASE | []W | Program |
| Z-Term | []Q | Program |
| Toad | []G | Program |
| Link | []L | PopDown |
| SCRAZBLE | []ZG | Program |
| QuickEdit | []ZQ | Program |
| WordFinder | []ZW | PopDown |
| EP-Fetch | []ZF | PopDown |
| Events | []ZW | Program |
The Default Device, Default Directory and Insert/Overtype modes in the Panel sets the defaults in the Activity you are working on at the time it is selected. These values are loaded into the Filer for that Activity.
Changing the default devices in the filer will only effect that particular application.
Change the default device when you fit a new device so it gets used.
The IMPORTANT settings that catch most people out are:-
Default Device
If this is still set to :RAM.0 on your Z88 and you have a RAM pack plugged in - you are not using it, and you will get 'no room' messages quite often or you are not using your Z88 enough!
Set it to :RAM.1 or 2 as the case may be.
Timeout
Set the Timeout to 2 or 1 to save battery power - but NOT to 0 - That cancels it!
Be sure to press the <ENTER> key and NOT <ESC> to update the Panel.
DRIVING
THE PRINTER
What type of
Printer Interface are you using?
Serial Printers use RS-232 interface which normally have pins/holes in the Plug/Socket
Parallel Printers use Centronic interface which normally have tongue/grooves in the Plug/Socket
Setting the Panel to drive the Parallel Printer
Parallel
printer
Set the Panel as shown - Plug in the cable - and GO.
![]()
Serial printer
- Choosing and setting the baud rate
- What all the bits do
- Setting the Parity bit
- Slowing the printer down Xon/Xoff - using the brake
- Common Problems for failing the Printer Test
Choosing and setting the baud rate
![]()
The transmit and receive baud rates should be set to the same values. Placing the cursor on the appropriate spot and pressing <>J will increment the available baud rates.
![]()
Choose the SAME SPEED for your PRINTER and the PANEL
What all the bits do
Data is sent down the same wire, one bit after another. So the printer can unscramble all the bits in the line, a stop bit is put onto the end to say "Well that's the end of that lot" after each number is sent.
The parity bit is used as a 'checking' bit which is sent by the computer to say "If I add up all the data bits I should get an EVEN number." The printer then accepts the number as a character if it agrees or throws it away it if it's wrong.
The Mark bit, if selected sets the 8th bit always to ONE and is used if only 7 bits are sent.
| 1 | 2 | 3 | 4 | 5 | 6 | 7 | 8 | P | S | S |
| M | ||||||||||
| <---- Data Bits 7 or 8 --> | --> | |||||||||
| MK BIT | PY BIT | STOP BIT(S) | ||||||||
e.g. 7 Data bits, One stop bit, No Parity = Mark Parity on Panel
The Computer must be sending the same format that the printer is set to, so the trick is to work out what you think the settings are first and then - Try them all until the printer PRINTS CORRECT CHARACTERS!
Setting the Parity bit
![]()
Options are: None Space Mark Odd or Even
Note: In versions of the Operating System up to and including 3.0 ODD and EVEN parity settings do not result in correct behaviour.
Slowing the printer down Xon/Xoff (using the brake)
![]()
Computers SEND information to PRINTERS FASTER than they can print it. The PRINTER controls a RED TRAFFIC LIGHT signal to STOP the computer sending any more so it can catch up.
There are TWO ways of doing this
a) Software (Xon/Xoff)
b) Hardware (The RTS line - Printer Cable)If the Printer is set to
RDY/BSY Protocol - Xon/Xoff No
XON/XOFF Protocol - Xon/Xoff Yes
Common Problems for failing the Printer Test
Serial printer - FAILED THE MOT - What NOW!!
| NO PRINTING Check | PRINTING but funny Characters | PRINTING but looses some text |
| Printer is ON ON LINE Cable is CORRECT (PC Link cable looks the same but isn't!) |
Parity setting wrong - try a different one |
Xon/Xoff is wrong Check |
Go for the Re-Test
Using
the Printer Editor
- Background on numbers
- What printers use
- EXERCISE - Making a Printer work with the Z88
- Getting information from the printer manual
- Getting your codes
- Entering Printer Codes
Background on numbers.
There have always been different ways of showing the same number.
Computers use the Binary System.
This is long and cumbersome for humans to use so there are different ways of showing the same number.
For example - This is the same number shown in different ways
| Decimal | Roman | Hex |
| 1988 | MCMLXXXVIII | 07C4 |
| ASCII | Binary | |
| BEL,"D" | 011111000100 |
A full ASCII conversion table is shown in Appendix 1
What printers use
Printers use 'hidden codes' to select different facilities the printer can give. These facilities are normally listed in the Printer Manual as COMMANDS. The Z88 Printer Editor already has "Epson Compatible" COMMANDS but sometimes these need changing because:-
(a) The Printer uses a different command to do the same thing or (b) a new COMMAND used e.g. Vertical enlargement as the
EXERCISE - Making a Printer work with the Z88
Overview
If a printer doesn't print with the Z88 - there is a good chance that the printer uses different codes (other than the Epson compatible codes) already programmed in the Printer Editor.
What YOU need to do is to find ALL the codes needed for the Z88 from the Printer Manual for the printer that doesn't work and enter them into the Printer Editor.
The Z88 Users Club have a Printer Editor library - you may find that the printer you have has already been 'coded.'
Getting information
from the printer manual
It's all there but WHERE???
For an example lets change the Alternative Font to Vertical enlargement
From Pinwriter P2200 Series User's Guide NEC FS V(n) Vertical enlargement FS V(n) selects vertical enlargement. n = 0 cancels vertical enlargement. n = 1 selects double vertical enlargement. Format: ASCII FS V(n) Decimal 28 86(n) Hexadecimal 1C 56(n) |
This is what it means
| Select Vertical enlargement | Cancels Vertical enlargement | ||||
| ASCII | FS,"V",1 | ASCII | FS,"V",0 | ||
| or | Decimal | 28,86,1 | or | Decimal | 28,86,0 |
| or | Hex | $1C,$56,1 | or | Hex | $1C,$56,0 |
Two groups of Numbers are required for the following printer styles - the first, to turn it on and the second to turn it off:-
| Command | ON codes | OFF codes |
| 1 Underline | ||
| 2 Bold | ||
| 3 Ext sequence | ||
| 4 Italics | ||
| 5 Subscript | ||
| 6 Superscript | ||
| 7 Alt.font | ||
| 8 User defined |
This table is left blank for you to use.
Entering Printer Codes
Printer Codes can be entered as follows
Decimal 65
Hexadecimal $41
Character "A"
ASCII symbol NULSeparated by a comma.
So if the Vertical enlargement example was to be implemented and used as the Alternative font - the codes would be entered as follows:-
| ON String | OFF String | |
| Alt. font | 28,86,1 | 28,86,0 |
Using the Printer Editor

Updating the Printer Editor - Page 1
Select the Printer Editor []E
REMEMBER
NAME your Printer Driver <>FC
SAVE it <>FS
But NONE of the changes will WORK unless you UPDATE DRIVER <>FU..!!
How the commands relate to PipeDream
These Codes translate into PipeDream Commands as follows
|
|
PipeDream |
|
|
| Mark | Command | ||
| Underline | 1 | <>PU | Underline |
| Bold | 2 | <>PB | Emphasised |
| Ext sequence | 3 | <>PX | |
| Italics | 4 | <>PI | Italics |
| Subscript | 5 | <>PL | Subscript |
| Superscript | 6 | <>PR | Superscript |
| Alt.font | 7 | <>PA | Condensed |
| User defined | 8 | <>PE | Quality font |
You can change this list to add your new commands to your printer whilst using PipeDream for reference.
NOTE: Although there are names given for these codes like 'Underline' and 'Subscript' you can change what each one does. Perhaps you never use Superscipt but want to use the 'Letter Quality' mode on your printer. Simply change the codes. You have 8 different types.
Using the Printer Editor
| Printer
Code EDITOR |
Printer on 27,64 | Translations A B C |
| Printer off | Char 163 (4) (7) | |
| End of page 12 | Changes to 27,82,3,(35,27,82,0) | |
| Allow line feed Yes | Character (2) (5) (8) | |
| HMI: Prefix | Changes to | |
| Suffix | Character (3) (6) (9) | |
| Offset | Changes to | |
| User |
Using Printer ON
Really useful Printer Function - Use it to select YOUR default Character Set. E.g. Near Letter Quality
More Numbers to find
| Command | ON codes | OFF codes |
| 1 Underline | ||
| 2 Bold | ||
| 3 Ext sequence | ||
| 4 Italics | ||
| 5 Subscript | ||
| 6 Superscript | ||
| 7 Alt.font | ||
| 8 User defined | ||
| 9 Printer on | ||
| 10 Printer off | ||
| 11 End of page |
Microspacing in PipeDream - Not all Printers have this function
The code output is <Prefix> N <Suffix> where N is the space value in 120th of an inch.For example The Diablo 630 Printer would be set
HMI: Prefix: ESC,US
Suffix: (none)
Offset: 1
The character translation table is used to convert the codes used by the keyboard and PipeDream uses into a different character(s) that the printer needs. The 'built-in' example changes the '#' sign but other examples may include changing the '!' to a 'full stop,' backspace, and 'single quotation mark' for printers that do not have an exclamation mark ' .
For Example
The epson driver uses the following sequence to print the '£' sign (code 163):
| 27,82,3, | 35, | 27,82,0 |
| Selects "England" Char Set | Prints it | Selects "USA" Char Set |
Finding out which code a key, on the keyboard is
Write the following BASIC program
Go into BASIC []B - Type in the following program
10 PRINT "Please Press a Key... (Return to Exit)" 20 A=INKEY(10) 30 IF A=(-1) THEN 20 40 PRINT CHR$(A)," = ",A 50 IF A<>13 THEN 10 |
Save the file
SAVE "KEYASCII.BAS"
Then type
RUNYou should get the following when pressing the '#' key
Please Press a Key... (Return to Exit) # = 163 Please Press a Key... (Return to Exit) |
Leave BASIC with the INDEX key and KILL the application
The
Filing System
- What are the Directories?
- Organising YOUR Files
- Creating a new directory
- Selecting a directory
- Copy existing files into the new directory
The Z88 uses a hierarchical filing system, which is like a filing cabinet, with the Directory names put on the DRAWERS.
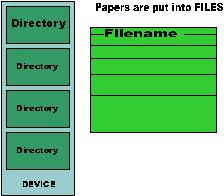
Organising YOUR Files
NORMALLY, you would not put a bit of paper into any old file, so don't do it here.
You could keep all those business letters together, or the special printer driver you have made together with the document that was printed, so it will be easy to find it again.
If you only have a few files to work with, then you can keep them all in the one drawer, otherwise create a new directory.
Creating a new directory
For example
Create a (New Drawer) Directory <>CD - Use Meaningful Names
Selecting a directory
Select IT
Either by
Selecting it on the display (by moving the cursor over the Directory name and pressing the <ENTER> key) then pressing <SHIFT> <DOWN ARROW> key.
OR Select Directory <>SI and typing in the name you have created.
Copy AN existing
file into the new directory
Select Copy <>CO
Name : FILENAME <ENTER>
New name : /DIRECTORY/FILENAME <ENTER>
Copy A NUMBER of existing files into the new directory
e.g. Copy files from :RAM.0 into a DIRECTORY name NEW
Select Tree Copy <>TC
Name : :RAM.0 <ENTER>
New name : /NEW/ <ENTER>
The
Filing System
Catalogue FILES and EPROM
They are different
You loose the Date and Time stamp on the EPROM Catalogues
File(s) Selection
REMEMBER - (for those who do not like typing filenames)
You can select the first file by moving the cursor over the filename and press <RETURN>.
For more than one file move the cursor over the filename and then there are two ways of select them:-
EITHER - press <SHIFT> <ENTER> together
OR press <TAB>and then select the function.
For Example
Erase <>ER - Erases the files
Copy <>CO - SHOULD Copy the files in the order selected into ONE file (but I have not succeeded in doing that YET!).
Directory Selection
You can select directories by moving the cursor over the directory and then
<SHIFT><DOWN-ARROW> will put you straight into the directory without typing in the name. Of course you can always type in the name by Selecting Directory <>SI
<SHIFT><UP-ARROW> will return you BACK again.
Basics of
CLI
What is the Command Line Interpreter (CLI)?
CLI is not really a Command Line Interpreter but is two things.
1. It is like a Tape Recorder - It can Record and Playback using the keyboard and the screen on the Z88 to a file or the Printer.
This can be used as a means of programming a sequence of 'key-stroke' functions for the Z88 to act on immediately or to save the action for a later date.
This releases the tedious tasks of going through a list of commands for a function that is used on a regular basis.
2. It can be used for redirection - lets look at that first.
Redirection
Normal Mode
When the Z88 is in it's normal state the keyboard is used as the INPUT and the screen as the OUTPUT.
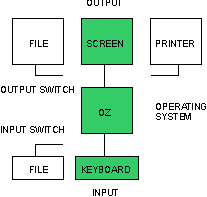
Redirection is achieved by using the CLI commands to OPERATE the INPUT and OUT switches.
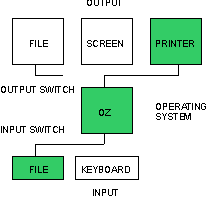
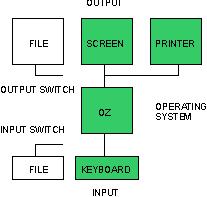
Types of REDIRECTION
1. A straight-forward REDIRECTION like sending the OUTPUT just to a file. 2. A 'T' type that redirects to 2 devices.
RE-DIRECTED OPERATION
Sending a FILE to the Printer
T RE-DIRECTION OPERATION
Sending the keyboard to the screen and the Printer
CLI Commands
Because we need to tell the Z88 that we want to press keys (like [] and <>) we need to use a special code for these keys.
Key Sequences
| Char | Significance | ||
| ~ | Used in combination with a LETTER to represent other special keys on the Z88. | ||
| . | As the first character indicates a FILE CONTROL COMMAND. | ||
| # | Holds down [] key whilst pressing another key. | ||
| | | Holds down <> key whilst pressing another key. | ||
| If any of the characters are required in the file type it TWICE. e.g. ~ would be typed ~~ | |||
| ~A | Single press of the [] key; ~A~A has no effect | ||
| ~C | Single press of the <> key; ~C~C has no effect | ||
| ~X | <DEL> | ||
| ~T | <TAB> | ||
| ~S | <SHIFT> | ~U | <UP-ARROW> |
| ~I | <INDEX> | ~D | <DOWN-ARROW> |
| ~M | <MENU> | ~L | <LEFT-ARROW> |
| ~H | <HELP> | ~R | <RIGHT-ARROW> |
| ~E | <ENTER> | |[ | <ESC> |
File Control Commands
Note there is a full stop in front of the commands
|
|||||||||||||||||
| .D | Delay nnn centi-seconds DO NOT use <ESC> when in delay | ||||||||||||||||
| .S | Suspend CLI; all current redirections remain in force. | ||||||||||||||||
| .*filename | Invoke new file to CLI - Call up another CLI file!! | ||||||||||||||||
| .J | JAM - Ignore special significance of subsequent characters. Used to stop funny characters being sent. | ||||||||||||||||
| .; | Comment - - Just for you to remember what you were trying to achieve. | ||||||||||||||||
There are FOUR OTHER modes of operation available without writing a CLI program. These are:-
(a) <<SEND>> the <<SCREEN>> and <<KEYBOARD>> to the PRINTER. []+P
(b) <<SEND>> the <<SCREEN>> to a FILE. []+S
(c) <<SEND>> the <<KEYBOARD>> to a FILE. []+K
(d) <<SEND>> or EXECUTE the FILE to the <<KEYBOARD>>.
Examples of
what a CLI could be used for
(a) Print out of the Catalogue
(b) Put all your expenses from your Diary into a file using the search facility to look for the # symbol.
(c) To send the sequence of characters from the keyboard to put into your Command File.
(d) Run a BASIC program.
- Example using []+P Print out of the Catalogue
- Example using []+S Sending the Screen output into a File
- Example using []+K Sending the Keyboard output into a File
- Example using []+K to make a Command File
- Example EXECUTing the Command File
- Reading files generated by CLI
- Temporary RAM
Example using
[]+P Print out of the Catalogue
Connect Printer
Select Panel []S
Check that Printer set up is correct
Leave Panel with <ESC> key
Select Filer []F
Select CLI function Printer Output []+P (CLI should appear on RHS of display)
Catalogue Files <>CF or Catalogue Eprom <>CE
When finished Deselect CLI function Printer Output []-P
(CLI should disappear on Right Hand Side of display)NOTE Any Keyboard entry will be printed double spaced.
Example using
[]+S Sending the Screen output into a File
For Example
How to put all your expenses from your Diary into a file using the search facility to look for the # symbol.
Select Diary []D
Select Search <>BSE
STRING TO SEARCH FOR
#
Produce List .....................Yes
Select CLI function <<SEND>> SCREEN to FILE. []+S (CLI should appear on RHS of display)
Press <RETURN> (Search function should now be running)
When finished Deselect CLI function <<SEND>> SCREEN to FILE. []-S (CLI should disappear on RHS of display)The file will be in :RAM.-/S.sgn
Using []+K Sending
the Keyboard output into a File
For Example
To send the characters from the keyboard to put into the Command File.
Select CLI function <<SEND>> KEYBOARD to FILE. []+K (CLI should appear on RHS of display)
Do the normal keystokes and work through the function you wish to record.
When finished Deselect CLI function <<SEND>> KEYBOARD to FILE. []-K (CLI should disappear on RHS of display)The file will be in :RAM.-/K.sgn
Example using
[]+K to make a Command File
For Example
Let's record the sequence of keystrokes to RUN the BASIC program.
If you make a mistake, it will be recorded in the file. You can either STOP and START AGAIN or continue, save it and edit the mistakes out afterwards.
Select Index
Select CLI function <<SEND>> KEYBOARD to FILE. []+K (CLI should appear on RHS of display)
Select BASIC []B
RUN "KEYASCII.BAS" <ENTER>
Deselect CLI function <<SEND>> KEYBOARD to FILE.
[]-K (CLI should disappear on RHS of display)The file will be in :RAM.-/K.sgn
Copy the File to a PERMANENT file
Select Filer []F
Select Copy <>CO
Name : :RAM.-/K.sgn <ENTER>
New name : KEY.CLI <ENTER>
Example EXECUTing
the Command File
EXECUTE the series of KEYBOARD from a Command File.
In the following example the BASIC program will be run using the example where we found what codes the computer uses to control characters
Select Filer []F
Select Execute <>EX
Name : :KEY.CLI <ENTER>You should see the Program run just as you did when inputting the Keystrokes.
Reading files generated
by CLI
ALL FILES GENERATED BY CLI ARE PUT INTO TEMPORARY RAM :RAM.-
To View files in the Temporary File with PipeDream
Select a New Copy of PipeDream (by moving the cursor over PipeDream in the Index)
Select File Load <>FL
Select the Filer []F
Select Select Device <>SV
Change to Name : :RAM.-
Move cursor over S.sgn or K.sgn file
Press <ENTER> to mark it
Press <ESC>
Change Save plain text Yes (by moving the <DOWN ARROW> Key) changing to Y then <ENTER>Text should now be Loaded into PipeDream file
What is Temporary
RAM
Temporary RAM- is what is says ** TEMPORARY ** It is scattered all over the Z88 Memory map - Do not be surprised if any of the files disappear as OZ - the Z88 Operating System may decide to gobble up memory (and these files)!
TIP It is a good idea to erase the files in temporary RAM as soon as you are finished with it as having these files can cause problems when doing a soft reset.
CLI and the ALARM
CLI lines can be put into your ALARM, so that your Z88 will 'do something' at a particular time set.
Here is a Program that will put the Z88 clock back on October the 28th.
| --DATE-- | --TIME-- |
| 28/10/1990 | 02:00:00 |
| BELL | ALARM TYPE |
| OFF | EXECUTE |
| REASON/COMMAND | |
| #T~R~E~D01:00:04~E~E | |
| REPEAT EVERY | No OF TIMES |
| NEVER | NEVER |
Can you work out what #T~R~E~D01:00:04~E~E means??
The Display will stay ON for the time set in the panel at 02:00:00, make sure you have 'Timeout' set to 6 or less (but NOT 0 as that Cancels Timeout) and enough battery power.
NOTE All Alarms will be lost when doing either a soft or hard reset, so how about putting the commands into a file?

 |
|||||||
![[Click here to send e-mail for real-time pricing]](../images/click_prices_328.gif) |
|||||||
 | ![[ Top of Page ]](../images/top_of_page.gif) |

|
|||||
![[ Front Page ]](../images/home1.gif) |
![[ BBC BASIC ]](../images/bbc_basic.jpg) |
![[ Z88 Section ]](../images/z88.gif) |
![[ PC Section ]](../images/pc.gif) |
||||
| �
[Rakewell Limited 1998 - Sep 2025] Rakewell 2025 - ? |
|||||||
| Click here to search on this site |
| Web Highlights | ||
| BBC BASIC for Windows | ||
| Flight Page | ||
| Z88 Section | ||
| Adverts Section | ||
![[ new ]](../furniture/updated.gif) Jamie's 2020 Review |
||
|
|
||
|
Training Days section Introduction Session 1 Session 2 Session 3 What's here? |
||


| We
ship to other countries - USA - Hong Kong - Europe See Price list page for details. |
||
|
Vic Gerhardi Banking Details
|
||

|
|||||||
