|
GENERAL |
|
Front Page |
|
 Pipedream |
|
|
Z88 |
|
Z88 |
|
Hardware |
|
 Spares Spares |
|
Software |
|
Shows |
|
Programmer's Section |
|
Quick Guide |
|
Reviews |
|
GDPR |
|
Help & FAQ |
|
Z88 2nd User Section |
|
|
EXTRA |
|
Site map |
|
| Feedback Help |
|
|
ARCHIVE SECTION |
|
|
GENERAL |
|
Adverts |
|
BBC BASIC |
|
Books |
|
Computer Fairs |
|
Flying Page |
|
PC |
|
|
NEWS |
|
Mailshot Promotions |
|
PC Newsletter |
|
 |
|
|
Z88 |
|
Z88 |
|
Hardware |
|
Software |
|
![]()
Sunday, 26-Jul-2026 01:41:44 BST
![]()
![]()
![]() Z88
Help & FAQ
Z88
Help & FAQ
2 - Fault Finding
Introduction |
The Cards |
||||||||||||||||||||||||||||||||||||||||||||||||||||||||||||||||||||||||||||
| There are normally five main areas that you need to check if your Z88 does not work. If the Z88 does not power up at all go to Dismantling your Z88, but check the text below if it is sort of working before you get your screwdriver out. | Make sure that you follow the Inserting RAM or ROM Cards Rules as the Z88 gets confused on what size of memory it has if this has not been followed. Memory cards sometimes do go faulty. If they do, you do not need to dismantle the Z88 to fix them. | ||||||||||||||||||||||||||||||||||||||||||||||||||||||||||||||||||||||||||||
Inserting RAM or ROM Cards Rules |
|||||||||||||||||||||||||||||||||||||||||||||||||||||||||||||||||||||||||||||
|
You can add more memory (RAM packs) by following the INSERT RAM/ROM procedure, any time. Whenever removing a RAM you need to do a Soft Reset. This will clear the FAIL message and all your files that you may have stored. You can add programs (ROMs) by following the INSERT RAM/ROM procedure again any time. Insert Ram/Rom Procedure
You should try to leave Slot 3 free for EPROMs as they can ONLY be used there. You can use any of the Slots for RAMs or ROMs except if you put a RAM in slot 3, your Z88 will use more battery power. I have found that the following combination works best. Slot 1 RAM. Slot 2 RAM/ROM. Slot 3 EPROM only. See Check Z88 Cards. |
|||||||||||||||||||||||||||||||||||||||||||||||||||||||||||||||||||||||||||||
| |
|||||||||||||||||||||||||||||||||||||||||||||||||||||||||||||||||||||||||||||
|
|
|||||||||||||||||||||||||||||||||||||||||||||||||||||||||||||||||||||||||||||
| After inserting any card, it is a good idea to check that your Z88 knows about it by selecting (<>CARD) while in the INDEX. |
The display should match what you have really got in the card slots. If this does not match, you have found another problem. Sometimes the EPROM is not shown. See Header on EPROM. |
||||||||||||||||||||||||||||||||||||||||||||||||||||||||||||||||||||||||||||
| Check FLASH, EPROM / ROM OR RAM Card  |
|||||||||||||||||||||||||||||||||||||||||||||||||||||||||||||||||||||||||||||
|
There are several sorts of memory failure. They all make the Z88 behave badly. Mechanical FailureThere are two sorts of mechanical failure. The first sort gives you unexplained "Memory stack overflow" or FAIL messages at the top of the screen. The most common fault that causes this is when the RAM card physically comes apart. You will notice this when removing the card from the Z88. It may be a loose fit. What you should find is that the RAM card is made up of two halves and these are coming apart. You can repair this by
The second sort is
that the Device just stops working due to the 'gold' contacts
becoming dirty.
The easiest way of doing this is by sliding the card in and out of the connector a few times. If this doesn't improve its performance use a very soft pencil rubber and clean both the connector in the Z88 and the 'gold' contacts. Be careful though, There is not a lot of 'gold' used on the connector, it is only 'mechanical gold' and you might find that you can clean it off altogether! |
|||||||||||||||||||||||||||||||||||||||||||||||||||||||||||||||||||||||||||||
|
The other type of failure is when part of the memory doesn't act like memory. This leads to inconsistent results when checking the size of the Ram with (<> CARD). For example, you may have a 512K Ram card in your Z88 but (<> CARD) reports that you only have 128K. See Check Z88 Cards. Running the BASIC program while `tapping' the RAM pack will find this sort of error. By downloading the following BBC Basic program, you can test 32K, 128K 512K and 1MB Ram packs. It is what is called a destructive Ram Test which means that all the data that is stored on the ram will be destroyed. So backup all your files before using it. See Backing up Files. Download the 4 files zipped, (original instructions, two .CLI files (which do the same thing) and the memory test software from here, and then transfer them to your Z88 with a transfer program. . There are two ways you can use this program.
#F to do the memory test, do the following:-
|
|||||||||||||||||||||||||||||||||||||||||||||||||||||||||||||||||||||||||||||
Soft Memory Errors |
|||||||||||||||||||||||||||||||||||||||||||||||||||||||||||||||||||||||||||||
|
The other sort of memory failure is where certain bits of memory suffer amnesia when you are not reading or writing to the memory. This is like when you are just storing files in the RAM. This fault can be found with any program, (zCheck, Zip, Unzip (Z88 Forever) or SqueeZ~88 (Rakewell)) that uses checksums on files. To use it you should:-
|
|||||||||||||||||||||||||||||||||||||||||||||||||||||||||||||||||||||||||||||
| |
|||||||||||||||||||||||||||||||||||||||||||||||||||||||||||||||||||||||||||||
| Device fails to boot OZ in slot 1 |
|||||||||||||||||||||||||||||||||||||||||||||||||||||||||||||||||||||||||||||
| Another
sort of memory failure only occurs when you are booting the Z88 from
slot 1 and it just fails to boot. This is caused by a card select
fault, it is NOT the software. This failure may not be detected when OZ is running as OZ is managing which card it is selecting. When you boot from slot 1, OZ is not running the individual card's hardware needs to select the card. The normal conclusion is that you may have the fault with the card in slot 1, but this is not true, it could be any of them, you need to take all your other cards out and see if the fault persists. Unfortunately, all the other tests - Flashtest and the memory test will not detect this fault as they are running under OZ which hides the fault. |
|||||||||||||||||||||||||||||||||||||||||||||||||||||||||||||||||||||||||||||
| |
|||||||||||||||||||||||||||||||||||||||||||||||||||||||||||||||||||||||||||||
The Display |
The Keyboard |
||||||||||||||||||||||||||||||||||||||||||||||||||||||||||||||||||||||||||||
| If the display is cracked this is easy to replace but it is the most expensive item in the Z88. Symptoms are obvious. Cracked or broken glass, with oozing chemicals coming out of the display. Do not allow these chemicals to have contact with your skin. They cause cancer. |
The Z88 can work for a while before it becomes difficult to switch it On/Off with the Shift keys. Most problems like this are caused by the conductive rubber layer underneath the keyboard becoming removed. Keys like the cursor, delete and Shift keys, are the first to go. I have read several interesting things that Z88 users have done to repair the keyboard. By far the best thing to do is to replace both the rubber mat and membrane simultaneously but failing this you can try the following:-
Unfortunately we do not have any UK rubber keyboards or membranes left. You can fit a foreign keymat instead. See Change Keyboard. |
||||||||||||||||||||||||||||||||||||||||||||||||||||||||||||||||||||||||||||
| |
|||||||||||||||||||||||||||||||||||||||||||||||||||||||||||||||||||||||||||||
| The Case |
|||||||||||||||||||||||||||||||||||||||||||||||||||||||||||||||||||||||||||||
 |
|||||||||||||||||||||||||||||||||||||||||||||||||||||||||||||||||||||||||||||
|
You can get problems if the case becomes damaged internally, due to the Z88 being dropped. This can lead to short circuits occurring, rattling from inside the Z88. See Case Damage. Case Version There are two versions of the case. The UK and most of the European cases are just made out of black plastic.
|
The USA version has the same plastic case from the outside but the inside is coated with a metallic finish. This improves the radio interference immunity so that the Z88 complies with the FCC regulations. Both have the same label on the back of the Z88 saying `Certified to comply with Class B limits Part 15 of FCC rules, ' so how can you tell the difference? If you look into an empty card slot (where the RAMs and EPROMs are fitted), you should see either a black or a silver inside. |
||||||||||||||||||||||||||||||||||||||||||||||||||||||||||||||||||||||||||||
| |
|||||||||||||||||||||||||||||||||||||||||||||||||||||||||||||||||||||||||||||
| Case Damage |
|||||||||||||||||||||||||||||||||||||||||||||||||||||||||||||||||||||||||||||
|
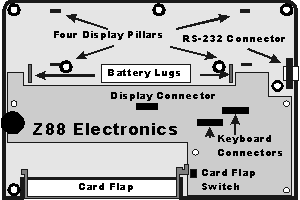
There are several parts that make up the complete case for the Z88. These are listed, with possible fault symptoms. The Display is the heaviest item in the Z88 and the least supported. Check that the four pillars that the display fits onto are still standing, with the rubber washers. Check the plastic battery lugs (the bit that supports the springs). They sometimes get broken resulting in the Z88 not working on batteries or worst still shorting out the power supply. The plastic lug behind the plastic leg often gets broken. The effect of this is that the leg always wants to flop down as there is nothing to hold it up when the leg is put away. This item can be replaced without dismantling your Z88. This also gives support to the display. Check that the four flat side supports for the display are still intact. You can often tell if they are not there by noticing a broken plastic ridge where it was. Normally, when the card flap is opened (with the Z88 turned on) the display goes out. This is because it operates a switch to let the operating system know that there are changes ahead. |
If the display does not go out, then the card flap or the support from the "Reaction plate" is broken and should be replaced. Although better RFI protection is achieved the metallic covering inside the case can lead to short circuits between the electronics and the case. This usually manifests itself after the Z88 has been reassembled. Underneath the printed circuit board there is normally an insulated mat. This can get punctured by IC pins on the board. The solution is to cut all those pins off close to the board. The other way shorts can occur is through the keyboard reaction plate. You should try to establish where the short is taking place, (easier said than done) and scrape the offending metallic part off the plastic making sure that no metallic bits fall anywhere near the electronics. Shorts can also occur while you are plugging in the Mains Adapter. These fall off and can be easily replaced. Do not use SUPERGLUE on the front feet. You might need to get to the screws underneath them. To change any of these parts yourself see Dismantling Your Z88. |
||||||||||||||||||||||||||||||||||||||||||||||||||||||||||||||||||||||||||||
| |
|||||||||||||||||||||||||||||||||||||||||||||||||||||||||||||||||||||||||||||
| The Z88 Electronics |
|||||||||||||||||||||||||||||||||||||||||||||||||||||||||||||||||||||||||||||
|
This is not an area for the weak hearted Z88 user. If the Z88 appears to work and then does unexplained things, the printed circuit board may be faulty. Usually if they go wrong they show themselves within the year's guaranty period. A good test here is to twist the Z88 longways. If the display goes out and comes on again or the fault occurs, some components may have `dry joints.' You can also check Power Consumption as this can reveal some electronics faults. You can check the power consumption of your Z88. This can show up problems with either the keyboard or electronics. All you need are the following:-
Cut the printed circuit board so that it will fit between the batteries in the Z88. Solder two bits of wire on each side of the printed circuit board. Fasten the crocodile clips to the other end of the wires. To measure the current do the following:-
See Power Consumption Table to compare your results. Static electricity is all around us. It does irreparable damage to low current electronic circuits, such as those used in the Z88. It can be also responsible for the Z88 doing a Soft Reset when you are inserting the Mains Adapter lead. If you are a person that experiences electric shocks when grabbing metalling objects you need to take several precautions when plugging the mains adapter in or Dismantling Your Z88. To get rid of static electricity, the object is to get all the parts that you are working with to the same voltage. This is normally done in the household by using the earth pin. As more items are made of plastic, you never get the chance to return to earth during the day. Here are a few tips that may help you. If you are Dismantling Your Z88 you should EARTH yourself and then the Z88 (by touching the metal part around the RS-232 serial port) before you start any work. Both feet in a bucket of salty water connected to the radiator may be going a bit too far. Remove all insulating materials like nylon and rubber soles. |
|||||||||||||||||||||||||||||||||||||||||||||||||||||||||||||||||||||||||||||
| |
|||||||||||||||||||||||||||||||||||||||||||||||||||||||||||||||||||||||||||||
|
|||||||||||||||||||||||||||||||||||||||||||||||||||||||||||||||||||||||||||||
|
|||||||||||||||||||||||||||||||||||||||||||||||||||||||||||||||||||||||||||||
| |
|||||||||||||||||||||||||||||||||||||||||||||||||||||||||||||||||||||||||||||
| Dismantling Your Z88 |
|||||||||||||||||||||||||||||||||||||||||||||||||||||||||||||||||||||||||||||
|
Invalidating Your Warranty Your Z88 comes with a year's guarantee. This is invalidated once you open the Z88. You should, if your Z88 is within the warranty period get in touch with your Z88 dealer before dismantling it. If your Z88 is outside the guarantee period or its origin is questionable, then here is your chance to see what is inside. Preparation
 Taking it all to bits You do not need to take the Z88 all to pieces to replace certain items. These points will be highlighted with what you can do there. Otherwise, just continue. You should take care with the display unit as this is fragile and will move about after the screws have been removed.
You should now have the Z88 all in bits. Putting it back together again This is the reverse of the above with the following points.
|
|||||||||||||||||||||||||||||||||||||||||||||||||||||||||||||||||||||||||||||
| Change Keyboard |
|||||||||||||||||||||||||||||||||||||||||||||||||||||||||||||||||||||||||||||
 |
|||||||||||||||||||||||||||||||||||||||||||||||||||||||||||||||||||||||||||||
|
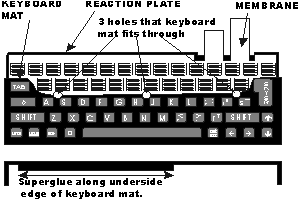
The keyboard is one of the most common causes for problems. Keyboard Assembly There are three parts of this assembly.
Normally only two parts need to be replaced. The mat and membrane. To assemble these, do the following:-
|
|||||||||||||||||||||||||||||||||||||||||||||||||||||||||||||||||||||||||||||
 |
|||||||||||||||||||||||||||||||||||||||||||||||||||||||||||||||||||||||||||||


 |
|||||||
![[Click here to send e-mail for real-time pricing]](../images/click_prices_328.gif) |
|||||||
 | ![[ Top of Page ]](../images/top_of_page.gif) |

|
|||||
![[ Front Page ]](../images/home1.gif) |
![[ BBC BASIC ]](../images/bbc_basic.jpg) |
![[ Z88 Section ]](../images/z88.gif) |
![[ PC Section ]](../images/pc.gif) |
||||
| �
[Rakewell Limited 1998 - Sep 2025] Rakewell 2025 - ? |
|||||||
| Click here to search on this site |
| Web Highlights | ||
| BBC BASIC for Windows | ||
| Flight Page | ||
| Z88 Section | ||
| Adverts Section | ||
![[ new ]](../furniture/updated.gif) Jamie's 2020 Review |
||
| Help Section
Contents Help Introduction 1 - Z88 Not Working 2 - Fault Finding 3 - Good Housekeeping 4 - Odd Bin 5 - Bugs 6 - FAST-TRACK 7 - File Conversion 8 - Mailmerge 9 - Printing |
||


| We
ship to other countries - USA - Hong Kong - Europe See Price list page for details. |
||
|
Vic Gerhardi Banking Details
|
||